Upgrading your car’s interior lights is a simple yet impactful way to enhance your driving experience. Brighter, whiter lights not only modernize your vehicle’s cabin but also improve visibility and comfort. While the bulb replacement itself is often straightforward, having the right Car Interior Bulb Tools can make the process significantly easier and prevent damage to your car’s delicate interior components. This guide will walk you through the essential tools and steps for replacing your car’s interior bulbs, drawing from real-world experience to ensure a smooth and successful DIY upgrade.
Why Invest in Car Interior Bulb Tools?
Many car owners underestimate the importance of specialized tools for interior bulb replacement. Attempting to pry out light covers or remove bulbs with makeshift tools like screwdrivers can lead to scratches, broken plastic clips, or even damage to the electrical components. Investing in a dedicated car interior bulb tools kit offers several key advantages:
- Prevents Damage: Plastic pry tools are designed to gently separate trim pieces and light covers without scratching or breaking them.
- Safe Bulb Removal: Bulb removal tools, like tweezers or specialized pliers, allow you to grip and remove bulbs, especially smaller ones, without risking burns or dropping them into hard-to-reach areas.
- Efficiency and Ease: The right tools significantly speed up the replacement process, making it a quick and hassle-free task even for beginners.
- Professional Finish: Using the correct tools ensures a clean and professional-looking result, maintaining the integrity of your car’s interior.
Essential Car Interior Bulb Tools: The Phone Repair Kit Advantage
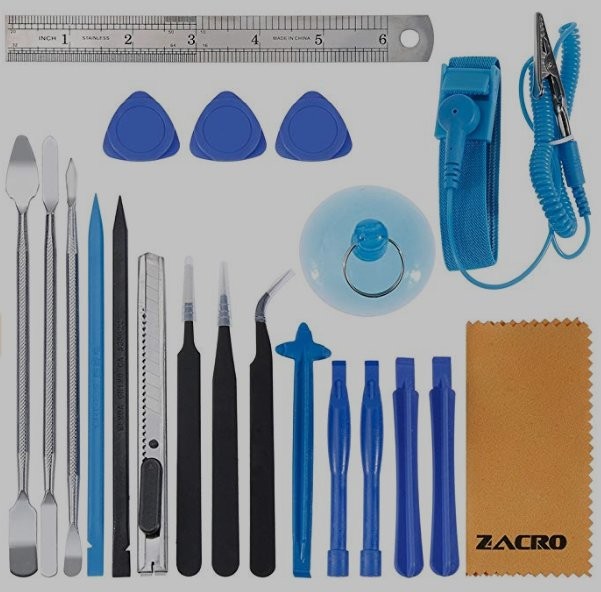
A surprisingly versatile and affordable solution for car interior bulb tools is a phone repair tool kit. These kits, readily available online for around $10, contain a variety of tools perfectly suited for delicate automotive interior work. Key components of a phone repair kit that are invaluable for bulb replacement include:
- Plastic Pry Tools: These are essential for safely prying off light covers, map light consoles, and visor vanity light housings without causing damage. Their varying shapes and sizes allow access to different types of trim pieces.
- Tweezers (Bent Tip): Bent tip tweezers are incredibly useful for accessing and removing small bulbs, especially map lights, which are often located in tight spaces and difficult to grip with fingers alone.
- Suction Cup: While less crucial for bulb replacement itself, a small suction cup (often included in phone repair kits) can be helpful for gently pulling out larger, flat light covers.
Using a phone repair kit as your car interior bulb tools not only saves you money compared to buying specialized automotive trim tools but also provides a compact and organized set for various DIY car maintenance tasks beyond just bulb replacement.
Step-by-Step Guide to Replacing Interior Bulbs
While the specific bulb types and locations may vary slightly depending on your car model, the general process for replacing interior bulbs remains consistent. This guide focuses on common interior lights and utilizes the car interior bulb tools mentioned above.
1. Map Lights: Precision is Key
Map lights, typically located near the rearview mirror, often require delicate handling.
Tools Needed: Plastic pry tool, tweezers.
Procedure:
- Pry the Cover: Carefully insert a plastic pry tool into the seam of the map light console cover, usually located between the two map lights. Gently pry downwards to release the clips holding the cover in place. Let the cover hang if it’s attached by wires.
- Remove Lens Cover: Once the console cover is loose, locate the lens cover for the individual map light. Pry from the inside edge of the lens cover outwards to release it. It should detach easily.
- Bulb Removal with Tweezers: This is where the bent tip tweezers become essential car interior bulb tools. Use the tweezers to grip the bulb firmly and gently pull it straight out of its socket. Avoid twisting or bending the bulb.
- Install New Bulb: Insert the new bulb into the socket, ensuring it’s oriented correctly (if it’s an LED bulb, it may only work in one direction).
- Reassemble: Reattach the lens cover and then snap the main console cover back into place.
2. Dome Light: A Central Upgrade
The dome light, usually located in the center of the car’s ceiling, is often the most used interior light.
Tools Needed: Plastic pry tool.
Procedure:
- Locate Pry Slot: Examine the dome light lens cover for a small slot or notch. This is where you’ll insert the plastic pry tool.
- Pry Off Lens Cover: Insert the plastic pry tool into the slot and gently pry downwards or outwards to release the lens cover clips. The cover should detach and may hang by a hinge or wires.
- Replace Bulb: Access the bulb and pull it straight out of the socket. Replace it with the new bulb.
- Reattach Lens Cover: Snap the lens cover back into place, ensuring it’s securely fastened.
3. Visor/Vanity Lights: A Touch of Elegance
Visor or vanity lights, found in the sun visors, add a touch of convenience and style.
Tools Needed: Plastic pry tool.
Procedure:
- Find the Access Slot: Locate the small slot on the edge of the vanity light cover.
- Pry Off Cover: Insert the plastic pry tool into the slot and gently pry to release the cover.
- Replace Bulb: Remove the old bulb and install the new one.
- Snap Cover Back: Press the cover back into place until it clicks securely.
4. License Plate Lights (Exterior but Related)
Although technically exterior, license plate lights are often grouped with interior bulb replacements as they are a simple and common upgrade.
Tools Needed: Small Phillips head screwdriver (may be needed), plastic pry tool (optional).
Procedure:
- Locate Screws (If Applicable): Some license plate light housings are secured with small Phillips head screws. If present, remove these screws.
- Pry Off Housing (If No Screws): If there are no screws, use a plastic pry tool to gently pry the light housing from the bumper or trunk lid.
- Access and Replace Bulb: Once the housing is loose, you can typically access the bulb from the back of the housing. Twist or pull the bulb socket to remove it, replace the bulb, and reassemble in reverse order.
Bulb Recommendations and Key Takeaways
- LEDs are the Upgrade: Consider upgrading to LED bulbs for your interior lights. LEDs offer brighter, whiter light, longer lifespan, and lower energy consumption compared to traditional incandescent bulbs.
- Affordable Options Exist: You don’t need to spend a fortune on expensive brand-name bulbs. Many reliable and affordable LED options are available online and at auto parts stores.
- Tool Kits are Essential: Investing in car interior bulb tools, like a phone repair kit, is a small price to pay for preventing damage and making the bulb replacement process much easier.
- Brightness Considerations: For vanity lights, be mindful of brightness. While brighter is generally better for map and dome lights, excessively bright vanity lights can be overwhelming. Consider lower output LED options for vanity lights if desired.
Upgrading your car’s interior lights is a rewarding DIY project that enhances both the aesthetics and functionality of your vehicle. By using the right car interior bulb tools and following these simple steps, you can achieve a professional-looking upgrade in under an hour.