Upgrading your car audio system often involves running new wires to your car doors for speakers or other components. One of the most challenging aspects of this process is navigating wires through the tight and often convoluted spaces of your car’s door jamb. This is where a Car Audio Wire Fish Tool becomes indispensable. This guide will walk you through how to effectively use a wire fish tool to snake wires through your door jamb, ensuring a clean and professional car audio installation.
Gathering Your Tools: The Essentials for Wire Fishing
Before you begin, it’s crucial to have the right tools at hand. While the star of the show is the car audio wire fish tool, you’ll also need a few other items to make the job easier:
- Car Audio Wire Fish Tool: This is your primary tool. Options range from flexible pickup tools with claw ends to antennas or even robust zip ties. The key is a tool that’s bendable yet firm enough to push through tight spaces and has a way to secure the wires. Avoid coat hangers, as they can damage wires.
- Electrical Tape: Essential for securely attaching your car audio wires to the fish tool and creating a smooth, snag-free profile.
- Panel Popper or Flat Screwdriver: For safely removing door panels and door jamb connectors without causing damage. A panel popper is preferable as it’s designed for this purpose and minimizes the risk of scratching or breaking plastic components.
Preparation is Key: Setting the Stage for Successful Wiring
Proper preparation will save you time and frustration. Follow these steps before you start fishing wires:
- Roll Down Your Windows: This prevents accidental window operation while the door panel is removed.
- Remove the Inner Door Panel: Carefully detach the inner door panel. The process varies by vehicle, but typically involves removing screws and using a panel popper to release clips.
- Disconnect Speakers: Unplug and, if necessary, remove the car speakers to provide better access and visibility inside the door cavity.
- Remove the Kick Panel (and Running Boards if applicable): Removing these panels near the floor will give you access to the wiring path leading into the car’s cabin. For specific guidance on your car model, resources like carstereohelp.com can be invaluable.
Accessing the Door Jamb: Exposing the Wiring Pathway
The door jamb is the rubber conduit that carries wires between the car door and the car body. You need to detach it to access the wiring channel:
- Pop Off the Door Jamb Connectors: There are typically two connectors – one on the door side and one on the car body side.
- Door Side Connector: Reach through the speaker hole from inside the door to access and pop off the door-side connector.
- Car Body Connector: Use your panel popper to carefully pry off the connector on the car body side. Work gently to avoid damaging the connector or surrounding paint.
Utilizing the Car Audio Wire Fish Tool: The Wire Snaking Technique
Now for the core of the process – using your car audio wire fish tool to guide wires through the door jamb:
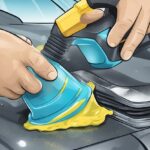
- Prepare Your Wires and Fish Tool: Tape your car audio wires (ideally 16 AWG or similar gauge for speakers) securely to the end of your fish tool with electrical tape. Ensure the taped section is as smooth and streamlined as possible to prevent snagging within the door jamb. Avoid creating any “flaps” of tape.
- Snake the Tool Through the Door Jamb: Carefully feed the fish tool, with the wires attached, into one end of the door jamb conduit and gently push it through to the other end. Patience is key here. Avoid forcing it, as you could damage existing wires or the door jamb itself.
- Pull the Wires Through: Once the fish tool emerges on the other side, gently pull it, drawing your new car audio wires along with it through the door jamb.
Routing Wires into the Cabin: Completing the Connection
After snaking the wires through the door jamb, you need to route them into the car’s interior:
- Pull Sufficient Slack: Pull enough wire through the door jamb to allow for door movement without stressing the connections. Leave some slack inside the door cavity as well.
- Locate the Interior Hole: Identify the opening inside the car’s cabin that corresponds to the door jamb conduit. This is where you’ll feed the wires into the car’s interior.
- Snake Through to the Cabin: Using the same technique with your car audio wire fish tool, carefully guide the wires through this interior hole and into the cabin. You should be able to access and pull the wires from inside the car.
Important Disclaimer: Car designs vary significantly. Some vehicles may have double firewalls or Molex plugs that complicate wire routing. In such cases, you might need to drill a new hole, ensuring you use a grommet and conduit to protect the wires. Always prioritize safety and wire protection. If you encounter significant difficulty, consult a professional car audio installer.
Final Steps and Tips: Ensuring a Professional Finish
- Repeat for the Other Side: Follow the same process for the other car door if you are wiring both sides.
- Reinstall Door Jamb Connectors: Securely reattach the door jamb connectors to both the door and the car body.
- Reinstall Door Panels and Components: Reassemble the door panel, speakers, kick panels, and any other components you removed.
- Test Your Connections: Before fully reassembling everything, test your new car audio wiring to ensure proper functionality.
With a car audio wire fish tool and these step-by-step instructions, running new wires through your car doors becomes a manageable DIY task. Enjoy the enhanced audio experience in your upgraded car audio system!