
The Avast Business CloudCare removal tool is a utility designed to completely uninstall Avast Business CloudCare from your devices. While standard uninstallation methods may sometimes fail or leave residual files, this tool ensures a clean removal process. This guide provides a step-by-step walkthrough on how to utilize the Avast Business CloudCare removal tool effectively.
When to Use the Avast Business CloudCare Removal Tool
The primary scenarios where the Avast Business CloudCare removal tool becomes necessary include:
- Failed Standard Uninstall: If the regular uninstallation process through the Control Panel or Start Menu encounters errors or doesn’t complete successfully.
- “Setup is Already Running” Error: This error message often indicates a conflicting process or leftover files from a previous installation attempt. The removal tool helps resolve this issue.
- Residual Files: Even after a seemingly successful uninstallation, some Avast Business CloudCare files and registry entries might remain on your system. The removal tool ensures a thorough cleanup.
- Troubleshooting: If you’re experiencing issues with Avast Business CloudCare and suspect corrupted files are the cause, the removal tool can help prepare your system for a clean reinstall.
How to Use the Avast Business CloudCare Removal Tool
Before proceeding, it’s crucial to understand that using the removal tool will completely uninstall Avast Business CloudCare and its components. Back up any essential data before starting the process. Also, note that this process typically requires restarting your computer in Safe Mode.
Step 1: Download the Avast Business CloudCare Removal Tool: The removal tool is a standalone executable file. You’ll need to download it from the official Avast website or a trusted source. Ensure you download the correct version for your operating system (Windows or macOS).
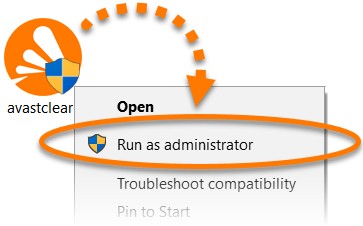
Step 2: Run the Tool as Administrator: Locate the downloaded file (usually named avastclear.exe for Windows). Right-click on the file and select “Run as administrator.” This ensures the tool has the necessary permissions to access and modify system files.
Step 3: Restart in Safe Mode: The removal tool will likely prompt you to restart your computer in Safe Mode. This mode loads a minimal set of drivers and services, preventing interference from other applications during the uninstallation process. Follow the on-screen instructions or consult your operating system’s documentation for how to boot into Safe Mode.
Step 4: Select the Installation Directory (if prompted): In some cases, the removal tool might ask you to confirm the installation directory of Avast Business CloudCare. If the default location is correct, you can proceed without changes.
Step 5: Initiate the Uninstall Process: Once in Safe Mode and with the correct directory selected (if applicable), click the “Uninstall” button in the removal tool. The tool will then begin removing all Avast Business CloudCare files and registry entries.
Step 6: Restart Your Computer: After the uninstallation completes, the tool will likely prompt you to restart your computer. This finalizes the removal process and ensures all changes are applied.
Post-Removal Considerations
After successfully removing Avast Business CloudCare, consider the following:
- Reinstallation: If you plan to reinstall Avast Business CloudCare, ensure you download the latest version from the official website.
- Alternative Security: Your device is no longer protected by Avast after the removal. Consider installing alternative security software if needed.
The Avast Business CloudCare removal tool provides a reliable solution for completely uninstalling the software. By following these steps, you can ensure a clean removal and prepare your system for troubleshooting or reinstallation. Remember to always download the tool from official sources and exercise caution when modifying system files.