Changing your car’s brake pads is a crucial maintenance task that can be done at home with the right tools and a bit of know-how. Knowing which Car Brake Pads Tools are necessary will ensure a smooth and successful brake pad replacement. This guide outlines the essential tools you’ll need and provides a step-by-step process for changing your front brake pads.
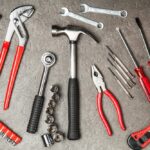
Must-Have Car Brake Pads Tools
Before you begin, gather the following car brake pads tools:
- Jack and Jack Stands: These are crucial for safely lifting and securing your vehicle. Never work under a car supported only by a jack.
- Lug Wrench: Used to remove the lug nuts that secure the wheel to the vehicle.
- C-Clamp or Caliper Spreader Tool: This tool is essential for compressing the brake caliper pistons back into their bores, making room for the new, thicker brake pads. A caliper spreader tool is generally preferred as it applies more even pressure and reduces the risk of damage.
- Basic Tool Set: Including sockets, wrenches, screwdrivers (including Torx or Allen bits), and a hammer. The specific sizes will vary depending on your vehicle. Consult your owner’s manual for specifics.
- Torque Wrench: While not strictly necessary for all vehicles, a torque wrench ensures that lug nuts and caliper bolts are tightened to the manufacturer’s specifications, preventing damage and ensuring safety.
- Gloves: Protect your hands from brake dust and grime. Brake dust contains harmful materials, so always wear gloves.
- Eye Protection: Safety glasses or goggles will shield your eyes from flying debris.
- Brake Cleaner: Use this to clean the brake components before and after installation. It helps remove dirt, grease, and old brake dust.
- Shop Rags or Paper Towels: Useful for wiping down parts and cleaning up spills.
- New Brake Pads: Purchase the correct brake pads for your specific vehicle make and model. Consult your owner’s manual or a parts specialist.
- Brake Fluid: (Optional) Have some brake fluid on hand in case the reservoir needs topping off after compressing the pistons. Ensure you use the correct type specified in your owner’s manual.
Step-by-Step Brake Pad Replacement Guide
Step 1: Prepare Your Vehicle
Loosen the lug nuts on the wheel you’re working on. Then, jack up the car and securely place it on jack stands. Remove the wheel.
Step 2: Access the Brake Caliper
Locate the caliper bolts (usually two) securing the brake caliper. Remove these bolts using the appropriate tool from your basic tool set. Carefully lift the caliper off the rotor, being mindful of the brake line. Support the caliper with a wire or bungee cord to avoid stressing the brake line.
Step 3: Remove Old Brake Pads and Hardware
Slide the old brake pads out of the caliper bracket. Inspect the pads – if the friction material is worn down to 1/8 inch or less, they definitely need replacement. Remove any retaining clips or hardware.
Step 4: Compress the Caliper Pistons
Use the C-clamp or caliper spreader tool to compress the caliper pistons back into their bores. This is necessary to accommodate the new, thicker brake pads. Monitor the brake fluid reservoir and remove fluid if it gets too full.
Step 5: Install New Brake Pads and Hardware
Clean the caliper bracket with brake cleaner. Apply a thin layer of brake lubricant to the contact points between the pads and the caliper bracket, avoiding the friction material. Install the new brake pads and any new hardware that came with them.
Step 6: Reassemble the Brake System
Carefully reinstall the caliper over the rotor and secure it with the caliper bolts. Torque the bolts to the manufacturer’s specifications using a torque wrench.
Step 7: Reinstall the Wheel
Put the wheel back on, tighten the lug nuts by hand, then lower the vehicle to the ground. Use the lug wrench to tighten the lug nuts in a star pattern to the manufacturer’s specified torque.
Step 8: Repeat for the Other Side
Repeat the entire process for the other front wheel.
Conclusion
Replacing your brake pads is a manageable DIY project with the right car brake pads tools. By following these steps and using the appropriate tools, you can save money and maintain your vehicle’s safety. Always consult your vehicle’s owner’s manual for specific instructions and torque specifications. Remember to pump your brakes several times after completing the job to restore pressure before driving.